Configure Postfix Email Forwarding on Ubuntu 18.04 / 20.04 / 22.04 / 24.04
This guide shows you how to forward emails like [email protected] to any other inbox
such as [email protected] using Postfix on Ubuntu 18.04, 20.04, 22.04 or 24.04.
Works for both Nginx and Apache servers.
I use DigitalOcean to host almost all of my WordPress sites on Nginx for performance and reliability. Postfix configuration works exactly the same on both Nginx and Apache servers, and once set up, it allows any address at your domain to forward to any external email address.
Step 1 – Install Postfix
Choose your Ubuntu version below (commands are identical):
Ubuntu 18.04
sudo apt updatesudo apt install postfix -yUbuntu 20.04
sudo apt updatesudo apt install postfix -yUbuntu 22.04
sudo apt updatesudo apt install postfix -yUbuntu 24.04
sudo apt updatesudo apt install postfix -yyourdomain.com.
Step 2 – Configure DNS Records
You need two DNS entries:
- A Record:
mail.yourdomain.com→ your server IP - MX Record:
yourdomain.com→mail.yourdomain.com

Step 3 – Edit Postfix Main Configuration
Open the main Postfix config:
sudo nano /etc/postfix/main.cfAdd these lines directly **below**:
alias_database = hash:/etc/aliasesvirtual_alias_domains = yourdomain.comvirtual_alias_maps = hash:/etc/postfix/virtualEnsure your domain is listed in mydestination:
mydestination = $myhostname, localhost, yourdomain.com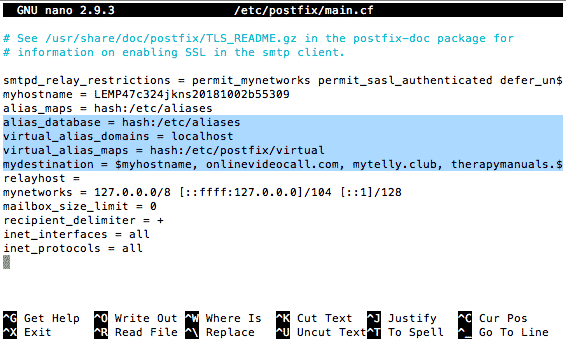
Step 4 – Create the Virtual Alias File
Open/create your alias file:
sudo nano /etc/postfix/virtualForward a single address:
[email protected] [email protected]Forward all (catch-all):
@yourdomain.com [email protected]Step 5 – Open Port 25
Allow incoming SMTP mail:
sudo ufw allow 25Step 6 – Map Aliases & Reload Postfix
sudo postmap /etc/postfix/virtualsudo systemctl reload postfixStep 7 – Test Your Forwarding
Send an email from a different address to:
[email protected]Check that it arrives in:
[email protected]- Do NOT send the test from the same address you're forwarding to.
- If there are issues, check logs:
sudo tail -f /var/log/mail.log
Extra Tips
Multiple aliases:
[email protected]     [email protected]
[email protected]  [email protected]
Forward to multiple recipients:
[email protected] [email protected], [email protected]Get $200 Free DigitalOcean Credit
Remember, if you don't already have a DigitalOcean account, you can get $200 free credit using my referral link below:
👉 Click here to claim $200 DigitalOcean credit
I use DigitalOcean for nearly all of my WordPress and Nginx servers, including the exact setup shown in this guide. It's fast, reliable, and perfect for running Postfix email forwarding.