How to Create a Reverse Proxy with NGINX on Ubuntu 18.04 Pointing to a cPanel WordPress Website over HTTPS with LetsEncrypt SSL.
This quick guide will show you how to hide your real server IP by using a NGINX Reverse Proxy that refers all traffic to the original website, thus hiding your real server IP.
Using CloudFlare as a reverse proxy is the normal way these days, however, some scripts and services are yet compatible with CloudFlare and you will also, in some cases, notice a huge drop in Adsense earnings due to CloudFlare's cache. A way around this is to build a revers proxy using NGINX. There are many guides out there, trust me, it took me about 10 days to work out what was going wrong, why I was getting "too many redirects" and "page cannot load" errors.
What I did was follow the guides and realised that when you use a reverse proxy for a WordPress website you need to pass the scheme header in the proxy config file. A simple one line of code fixed everything!
Below I show you how to create a reverse proxy on NGINX to a WordPress website on cPanel running on SSL.
1, First of all you need a cheap VPS. As always, I use DigitalOcean and a $5 Ubuntu 18.04 droplet is all you need for this, no matter how much traffic your website has, this is not going to use up lots of server resources. If you haven't got a DigitalOcean account, use this link here to get $100 free credit.
2, SSH into your VPS as root. So use the command "ssh root@ServerIP" then enter the server password.
3, Next we need to run the following commands to update and install NGINX.
sudo apt-get update
sudo apt-get install nginx
4, We now run 3 commands to make sure NGINX will start on a server reboot. Enter the commands below:
sudo systemctl stop nginx.service
sudo systemctl start nginx.service
sudo systemctl enable nginx.service
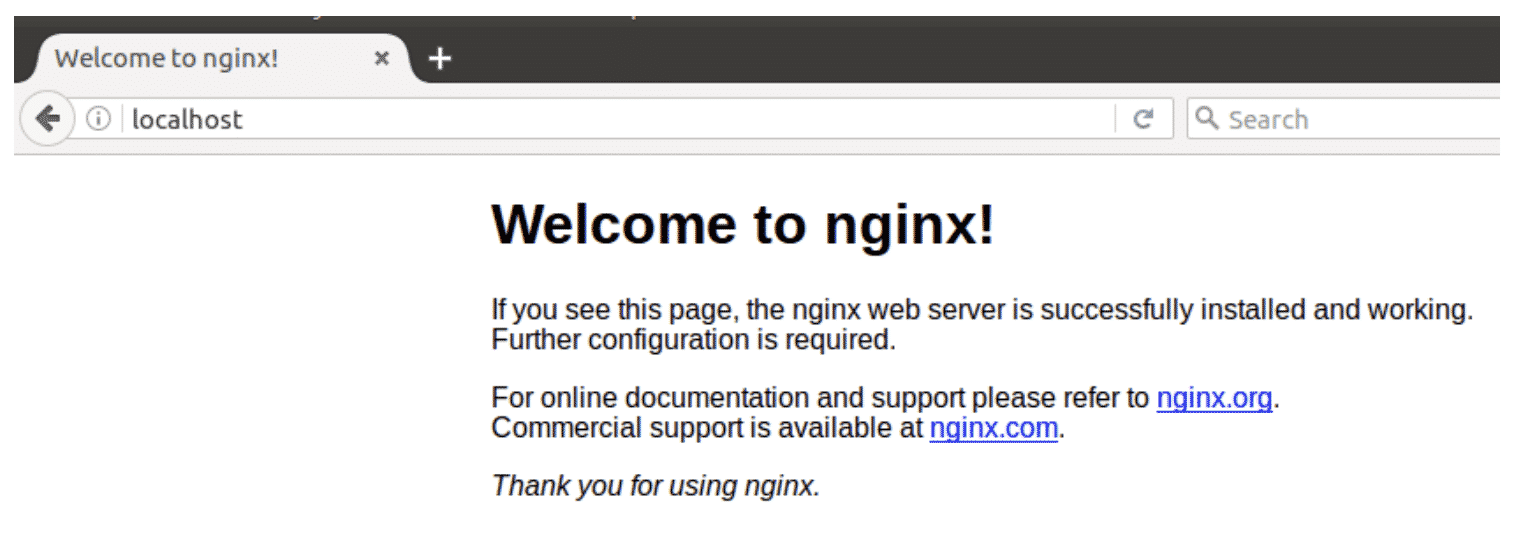
5, Check NGINX is installed and running by visiting the server IP in a browser, you should get the following:
6, Next is to create the reverse proxy config file that will redirect all traffic from the proxy on standard port 80 to https port 8080 on cPanel target server. We can do this with multiple websites by creating a proxy config file for each domain. Use the code below to create your first proxy config file, substituting DOMAINNAME.COM for your actual website domain name.
sudo nano /etc/nginx/sites-available/DOMAINNAME.COM
7. Copy and paste the following into the empty file replacing DOMAINNAME.COM and SERVER IP with your website domain name and real cPanel server IP that is hosting your website.
server {
    listen 80;
    listen [::]:80;
    server_name  DOMAINNAME.com www.DOMAINNAME.com;
    proxy_set_header X-Forwarded-Proto $scheme;
    proxy_redirect           off;
    proxy_set_header         X-Real-IP $remote_addr;
    proxy_set_header         X-Forwarded-For $proxy_add_x_forwarded_for;
    proxy_set_header         Host $http_host;

    location / {
            proxy_pass http://SERVERIP:8080;
        }
}
8, Next we test your config file by running the command below:
sudo nginx -t
If successful you will see something like:
Output:nginx: the configuration file /etc/nginx/sites-available/NginxProxy syntax is ok nginx: configuration file /etc/nginx/sites-available/NginxProxy test is successful
9, We now add the config file to the sites enabled directory and restart NGINX (replace DOMAINNAME.COM with your website domain name which is the same name as your config file you created) using the command below:
sudo ln -s /etc/nginx/sites-available/DOMAINNAME.COM /etc/nginx/sites-enabled/
sudo systemctl restart nginx.service
10, Now make sure you have your domain name A record pointing to your NGINX Reverse Proxy server IP and not the cPanel IP. Set the TLS to 2 minutes so you know it should be around 2 minutes to propagate. If your website is running on NON SSL then you should be good to go and when you load your domain name in a browser it will load your website in http. If you are using an SSL certificate, continue to step 11 below.
11, We now install LetsEncrypt SSL so we can reverse proxy to our website in HTTPS. Please make sure you have SSL installed on your website running on cPanel already to avoid connection errors. Use the commands below to install LetsEncrypt SSL onto your reverse proxy:
sudo add-apt-repository ppa:certbot/certbot
sudo apt install python-certbot-nginx
sudo ufw allow 'Nginx Full'
sudo systemctl reload nginx
sudo certbot --nginx -d DOMAINNAME.COM -d WWW.DOMAINNAME.COM
Enter everything the install asks for and make sure to use option 2 at the end to redirect all traffic via https.
12, Restart NGINX using the command below:
sudo systemctl restart nginx
13, Now load up your website in a browser using https and check it loads. If you see it working, you have successfully installed a reverse NGINX proxy to your WordPress site running on a cPanel server. Your original IP is now hidden behind the reverse proxy IP.